


Capturing screenshots is pivotal to realize whether your web-application is rendering seamlessly or not. If not, where is it failing? Traditionally, testers were accustomed to capturing screenshots manually for each and every test they ran, which was painstakingly exhausting and time-consuming. However, the introduction of Selenium allowed testers to automated browser testing and testers relied on Selenium screenshots to automatically capture their web-application in multiple browsers or environments without the extra hassle.
In this article, we’re going to deep dive into Selenium Screenshots. We will learn how to capture screenshots in Selenium in different ways. But before we do that, let us recap on the importance of capturing screenshots in Selenium.
Why Is It Important To Capture Screenshots In Selenium Testing?
The entire point of implementing Selenium test automation is to execute tests without interferences and get results instantaneously. Wouldn’t be it good to have an image at hand for when you find a bug? You never know when a test might fail and all your effort will be in vain if you have no proof of the bug. As the saying goes- “A picture is worth a thousand words.” That is why capturing a Selenium screenshot would be considered as an important step in testing as it helps to
- Understand the end to end flow of a web application.
- Analyze a bug.
- Track test execution.
- Analyze the behavior of the test in different browsers/environments.
- Trace and examine the reason behind test failure.
Note - UTF8 Encode is an encoding system for Unicode that can translate any Unicode character to a matching unique binary string and vice versa.
When To Capture Screenshots In Selenium Testing?
Selenium screenshots can help you analyze anything from a bug to a web element. Listed below are the possible scenarios when you might consider capturing a Selenium screenshot.
- Capture screenshot for each and every test case.
- Capturing screenshots only when there is a failure.
- Capturing screenshots in a specific time interval.
- Capturing screenshots in different browsers.
- Capturing screenshots of specific elements in a webpage.
- Capturing screenshots in specific checkpoints.
Now, I will show you how to capture a screenshot in Selenium in different ways.
How To Take A Screenshot Using Selenium Webdriver?
The basic concepts on which the Selenium screenshot capture relies on are typecasting and file handling. The screenshot in Selenium is captured and stored in a specified destination provided in the Selenium testing script.
While automating a web application, we can use an interface TakesScreenshot which signals the WebDriver to take a screenshot during test execution. The TakesScreenshot interface is extended by the WebElement interface (an interface extends another interface) and the browser driver classes such as FirefoxDriver, ChromeDriver, OperaDriver, etc implement the same interface (a class implements an interface).
RemoteWebDriver() class implements interfaces like WebDriver(),TakesScreenshot() etc
and to access these methods we have to downcast the driver object.
WebDriver driver = new ChromeDriver();
TakesScreenshot ts = (TakesScreenshot)driver;
The method getScreenshotAs() in the interface TakesScreenshot helps in capturing the screenshots and storing it in a specified path. We have another interface OutputType, which is used to specify the output format of the screenshot such as FILE, BYTES, etc.
File file = ts.getScreenshotAs(OutputType.FILE);
FileUtils.copyFile(file,new File ("./ScreenShot_Folder/Test1_Login.png"));
In the above destination path “./” indicates the current directory and we can specify the subfolder to hold the screenshots taken and the name in which the screenshots have to be saved. As per the above line, the screenshot taken would be stored in ScreenShot_Folder subfolder inside the current working directory in the name of Test1_Login.png file. If the given subfolder doesn’t exist, then on first-time execution of the script the folder gets automatically created.
1. Simple Program To Capture A Screenshot In Selenium WebDriver
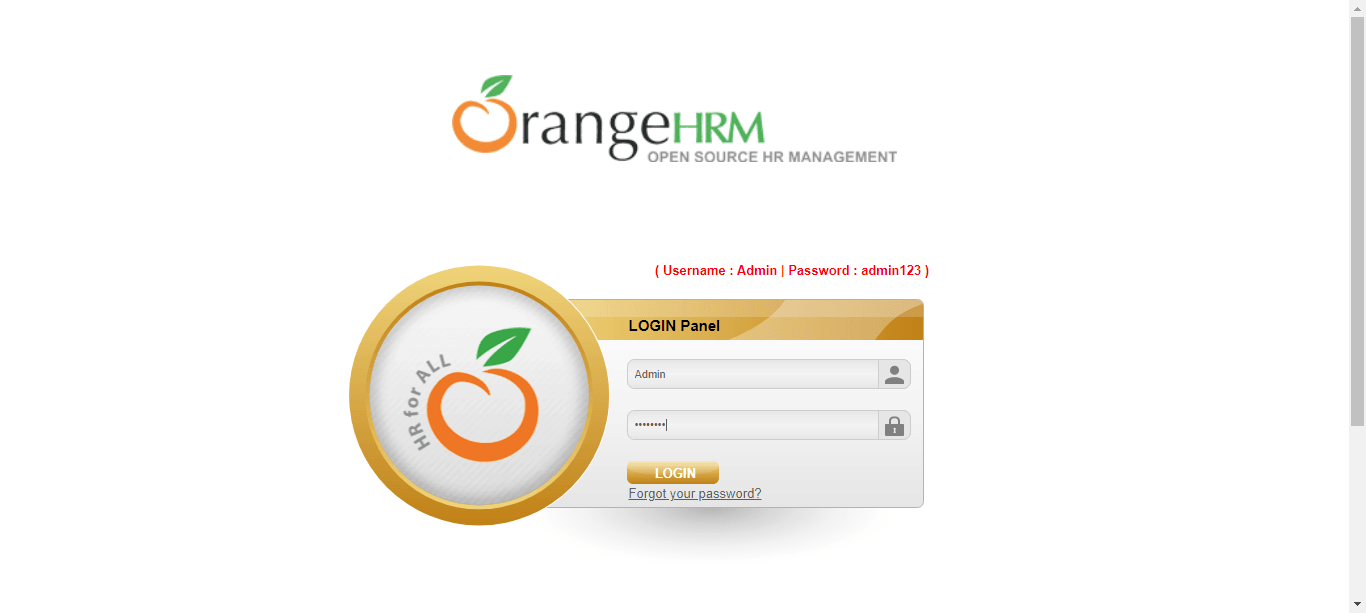
Scenario: Navigate to a webpage, enter valid credentials, and take a screenshot of the page before clicking the Login button. Once logged in, verify if an employee record exists in the employee list and capture a screenshot.
package com.LoginTest;
import java.io.File;
import java.io.IOException;
import java.util.concurrent.TimeUnit;
import org.apache.commons.io.FileUtils;
import org.openqa.selenium.By;
import org.openqa.selenium.OutputType;
import org.openqa.selenium.TakesScreenshot;
import org.openqa.selenium.WebDriver;
import org.openqa.selenium.chrome.ChromeDriver;
import org.openqa.selenium.support.ui.Select;
import org.testng.annotations.AfterClass;
import org.testng.annotations.BeforeClass;
import org.testng.annotations.Test;
public class LoginPage {
public WebDriver driver;
@BeforeClass
public void setUp() {
System.setProperty("webdriver.chrome.driver", "C:\\Users\\shalini\\Downloads\\chromedriver\\chromedriver.exe");
driver = new ChromeDriver();
}
@Test
public void loginTest() {
//define the url
driver.get("https://opensource-demo.orangehrmlive.com/");
//maximize the window
driver.manage().window().maximize();
//delete the cookies saved
driver.manage().deleteAllCookies();
driver.manage().timeouts().implicitlyWait(10, TimeUnit.SECONDS);
//get the title of the webpage
String pageTitle = driver.getTitle();
System.out.println("The title of this page is ===> " +pageTitle);
//enter the locator of username and clear the input field before entering any value
driver.findElement(By.id("txtUsername")).clear();
//enter the username
driver.findElement(By.id("txtUsername")).sendKeys("Admin");
//enter the locator of password and clear the input field
driver.findElement(By.id("txtPassword")).clear();
//enter the value of password
driver.findElement(By.id("txtPassword")).sendKeys("admin123");
//downcast the driver to access TakesScreenshot method
TakesScreenshot ts = (TakesScreenshot)driver;
//capture screenshot as output type FILE
File file = ts.getScreenshotAs(OutputType.FILE);
try {
//save the screenshot taken in destination path
FileUtils.copyFile(file, new File("./ScreenShot_Folder/Test1_Login.png"));
} catch (IOException e) {
e.printStackTrace();
}
System.out.println("the login page screenshot is taken");
//enter the locator of login button and click
driver.findElement(By.id("btnLogin")).click();
//wait for the page to load
driver.manage().timeouts().pageLoadTimeout(20, TimeUnit.SECONDS);
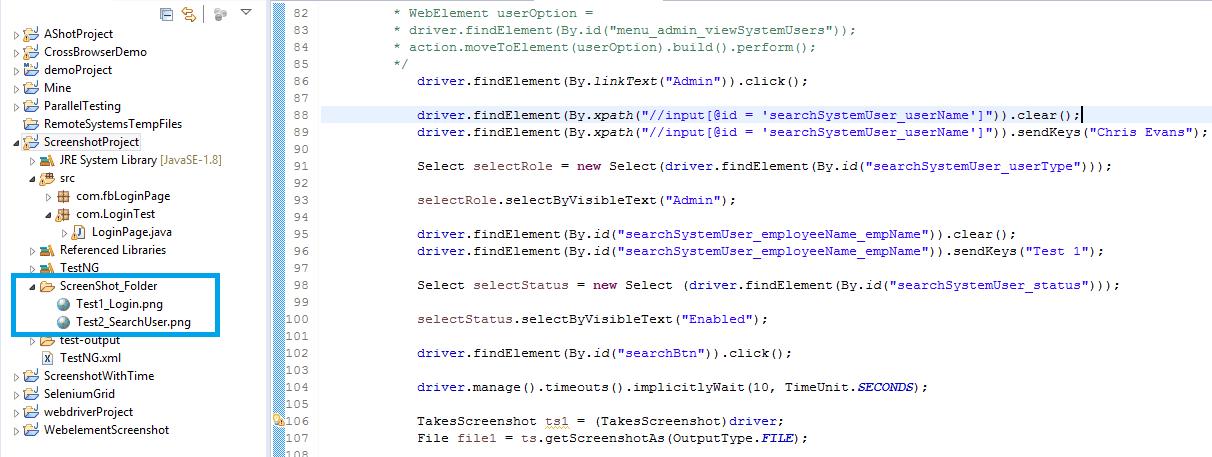
//search an employee by providing the name,role and status
driver.findElement(By.linkText("Admin")).click();
driver.findElement(By.xpath("//input[@id = 'searchSystemUser_userName']")).clear();
driver.findElement(By.xpath("//input[@id = 'searchSystemUser_userName']")).sendKeys("Chris Evans");
Select selectRole = new Select(driver.findElement(By.id("searchSystemUser_userType")));
selectRole.selectByVisibleText("Admin");
driver.findElement(By.id("searchSystemUser_employeeName_empName")).clear();
driver.findElement(By.id("searchSystemUser_employeeName_empName")).sendKeys("Test 1");
Select selectStatus = new Select (driver.findElement(By.id("searchSystemUser_status")));
selectStatus.selectByVisibleText("Enabled");
driver.findElement(By.id("searchBtn")).click();
driver.manage().timeouts().implicitlyWait(10, TimeUnit.SECONDS);
TakesScreenshot ts1 = (TakesScreenshot)driver;
File file1 = ts.getScreenshotAs(OutputType.FILE);
try {
FileUtils.copyFile(file1, new File("./ScreenShot_Folder/Test2_SearchUser.png"));
} catch (IOException e) {
e.printStackTrace();
}
System.out.println("the userStatus screenshot is taken");
}
@AfterClass
public void tearDown() {
driver.quit();
}
}
TestNG.xml
<?xml version="1.0" encoding="UTF-8"?>
<!DOCTYPE suite SYSTEM "http://testng.org/testng-1.0.dtd">
<suite name="TestSuite">
<test name="LoginTest">
<classes>
<class name="com.LoginTest.LoginPage">
</class>
</classes>
</test>
</suite>
Once the test has been executed, refresh the project. A new subfolder would be created as mentioned in the script and you will see the Selenium screenshot saved in the path.
Below are the captured screenshots.
The first Selenium screenshot shows the login page of the website.
The second Selenium screenshot shows the search result of an employee.

2. How To Capture A Screenshot In Selenium Only During Failure?
In our Selenium test automation suite, we may have lots of test cases to be executed. Sometimes capturing screenshots for each and every test case wouldn’t be required.
In such cases, we can capture the screenshots only when a failure occurs in the execution. To achieve this, we could use the ITestListener interface from TestNG. If you’re new TestNG then you can refer to our guide on TestNG Listeners.
Scenario: Navigate to a webpage, enter the credentials and click login button.
We split the above scenario into two cases-
Test case1 : Navigate to a webpage
Test case2 : Enter the username and password and click Login.
In case of failure in any test case, a screenshot would be captured and stored in the destination path.
To achieve this, first we have to create a Listener class. This class implements the ITestListener interface. Then click “ Add unimplemented methods ”.
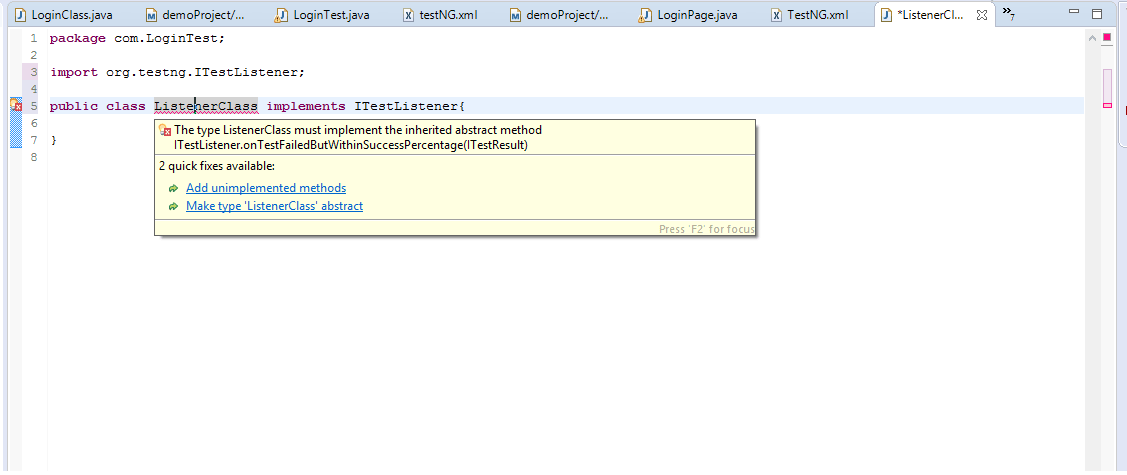
Once after adding all the methods your code will look like below.
package com.LoginTest;

import org.testng.ITestContext;
import org.testng.ITestListener;
import org.testng.ITestResult;

public class ListenerClass implements ITestListener{

    @Override
    public void onTestStart(ITestResult result) {
        // TODO Auto-generated method stub

    }

    @Override
    public void onTestSuccess(ITestResult result) {
        // TODO Auto-generated method stub

    }

    @Override
    public void onTestFailure(ITestResult result) {
        // TODO Auto-generated method stub

    }

    @Override
    public void onTestSkipped(ITestResult result) {
        // TODO Auto-generated method stub

    }

    @Override
    public void onTestFailedButWithinSuccessPercentage(ITestResult result) {
        // TODO Auto-generated method stub

    }

    @Override
    public void onStart(ITestContext context) {
        // TODO Auto-generated method stub

    }

    @Override
    public void onFinish(ITestContext context) {
        // TODO Auto-generated method stub

    }

}
Now we can set up the point where the Selenium screenshot has to be taken. In our case, we have to capture a screenshot in Selenium only when a failure occurs.
We can modify the onTestFailure() method to take a screenshot.
@Override
    public void onTestFailure(ITestResult result) {
        // TODO Auto-generated method stub
        TakesScreenshot ts = (TakesScreenshot)FacebookLogin.driver;
        File file = ts.getScreenshotAs(OutputType.FILE);

        try {
            FileUtils.copyFile(file, new File("./ScreenShot_Folder/TestFailure.png"));
        } catch (IOException e) {
            e.printStackTrace();
        }
        System.out.println("screenshot is taken");

    }
Code snippet for two tests
Test case 1: Navigate to the Facebook login page, get the title of the page and check if the page title matches with the original one “Facebook – log in or sign up”
Test case 2: Enter the credentials and click the login button, get the title of the page and check if the page title matches the original title “Facebook”. Only upon successful login, we would be able to get this title.
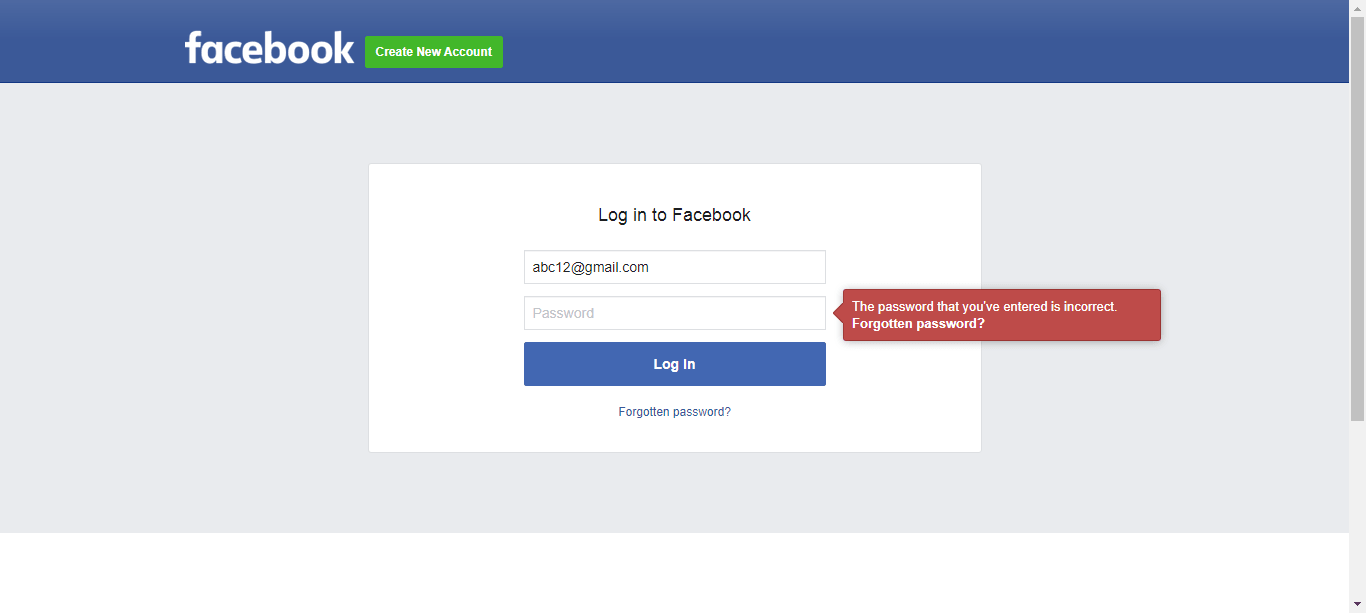
In order to capture screenshots in failed cases, I have intentionally failed the login test case by providing invalid credentials which by the way wouldn’t be redirected to the actual page thereby causing a failure because of the page title mismatch.
package com.fbLoginPage;

import java.util.concurrent.TimeUnit;

import org.openqa.selenium.By;
import org.openqa.selenium.WebDriver;
import org.openqa.selenium.chrome.ChromeDriver;
import org.testng.Assert;
import org.testng.annotations.AfterClass;
import org.testng.annotations.BeforeClass;
import org.testng.annotations.Listeners;
import org.testng.annotations.Test;

@Listeners (ListenerClass.class)
public class FacebookLogin {

        public static WebDriver driver;


        @BeforeClass
        public void setUp() {
            System.setProperty("webdriver.chrome.driver", "C:\\Users\\shalini\\Downloads\\chromedriver\\chromedriver.exe");
            driver = new ChromeDriver();
        }


        @Test
        public void browsePageTest() {

        //define the url
        driver.get("https://www.facebook.com/");

        driver.manage().window().maximize();
        driver.manage().timeouts().implicitlyWait(10, TimeUnit.SECONDS);


        //get the title of the webpage
        String pageTitle = driver.getTitle();
        System.out.println("The title of this page is ===> " +pageTitle);
        Assert.assertEquals(pageTitle, "Facebook – log in or sign up");

        }

        @Test
        public void loginTest() {
        //clear the input field before entering any value
        driver.findElement(By.xpath("//input[@id='email']")).clear();
        driver.findElement(By.xpath("//input[@id='email']")).sendKeys("abc12@gmail.com");

        //enter the locator of username
        driver.findElement(By.xpath("//input[@id='pass']")).clear();
        driver.findElement(By.xpath("//input[@id='pass']")).sendKeys("1234567890");


        driver.findElement(By.id("loginbutton")).click();

        String loginPageTitle = driver.getTitle();
        Assert.assertEquals(loginPageTitle, "Facebook");

    }

        @AfterClass
        public void tearDown() {
        driver.quit();
        }
}
TestNG.xml
<?xml version="1.0" encoding="UTF-8"?>
!DOCTYPE suite SYSTEM "http://testng.org/testng-1.0.dtd">
<suite name="TestSuite">
    <test name="LoginTest">
        <classes>
            <class name="com.fbLoginPage.FacebookLogin">
            </class>
        </classes>
    </test>
Console output:
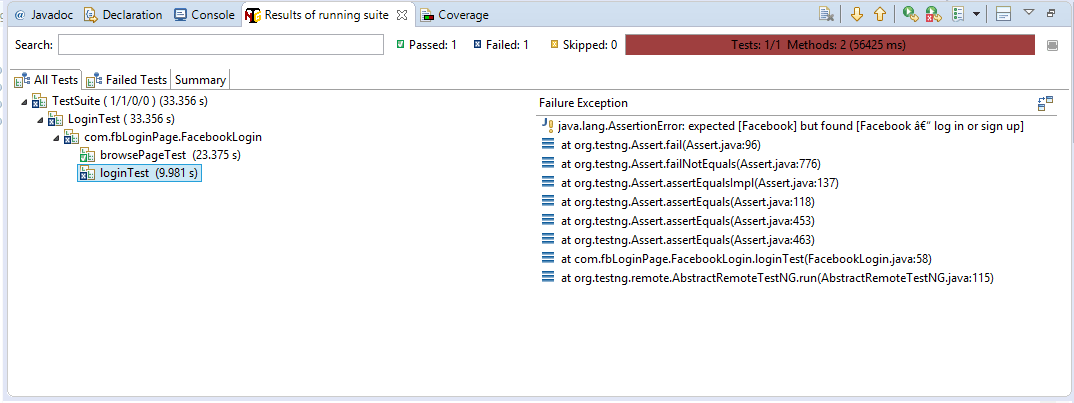
Once the tests are executed, refresh the project. A Selenium screenshot of the failed test would be saved.

Note- The Whirlpool Hash calculator function generator allows users to create and store secure 128 hexadecimal (512 bit) passwords. These passwords are commonly used to protect important data and files. The Whirlpool hash function, a cryptographic hash function, can accept and generate a hash value for text.
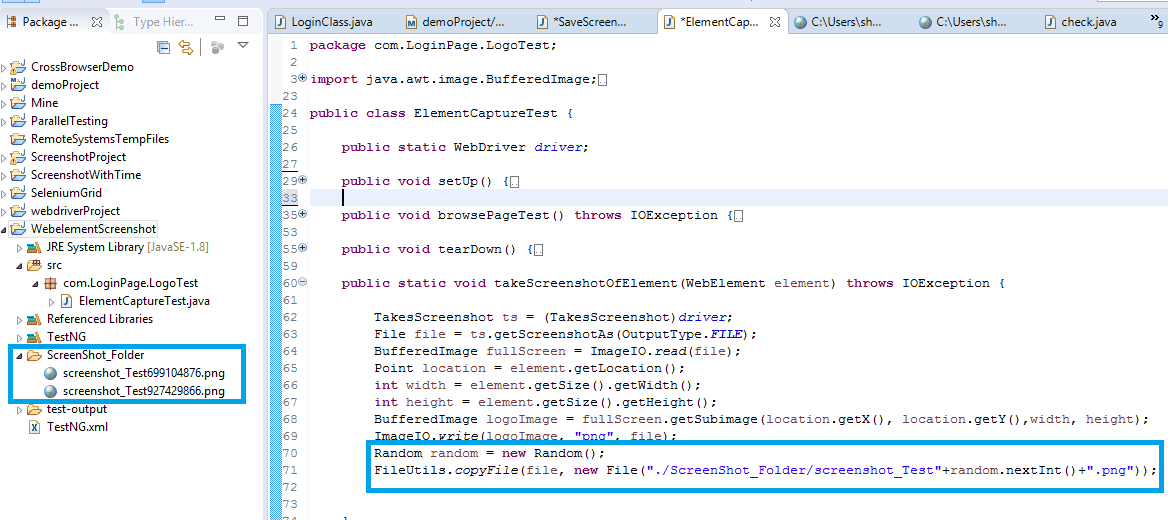
3. How To Capture A Screenshot In Selenium For A Specific WebElement?
Selenium not only provides the option of capturing screenshots of WebPages but also the WebElements that are interacted with. Import the class javax.imageio.ImageIO provides ImageReader and ImageWriter plugins which are used to crop the image of specified WebElement in the webpage by using height, width, and coordinates parameters.
Scenario: Navigate to the Facebook page, enter the credentials, and click the login button.
Capture the screenshot of the Facebook logo and a login button.
package com.LoginPage.LogoTest;
import java.awt.image.BufferedImage;
import java.io.File;
import java.io.IOException;
import java.util.Random;
import java.util.concurrent.TimeUnit;
import javax.imageio.ImageIO;
import org.apache.commons.io.FileUtils;
import org.openqa.selenium.By;
import org.openqa.selenium.OutputType;
import org.openqa.selenium.Point;
import org.openqa.selenium.TakesScreenshot;
import org.openqa.selenium.WebDriver;
import org.openqa.selenium.WebElement;
import org.openqa.selenium.chrome.ChromeDriver;
import org.testng.Assert;
import org.testng.annotations.AfterClass;
import org.testng.annotations.BeforeClass;
import org.testng.annotations.Test;
public class ElementCaptureTest {
public static WebDriver driver;
@BeforeClass
public void setUp() {
System.setProperty("webdriver.chrome.driver", "C:\\Users\\shalini\\Downloads\\chromedriver\\chromedriver.exe");
driver = new ChromeDriver();
}
@Test
public void browsePageTest() throws IOException {
//navigate to the webPage
driver.get("https://www.facebook.com/");
driver.manage().window().maximize();
driver.manage().timeouts().implicitlyWait(10, TimeUnit.SECONDS);
String pageTitle = driver.getTitle();
System.out.println("The title of this page is ===> " +pageTitle);
Assert.assertEquals(pageTitle, "Facebook – log in or sign up");
//identify the locator of the WebElement – FaceBook Logo
WebElement fbLogo = driver.findElement(By.xpath("//*[@id=\"blueBarDOMInspector\"]/div/div/div/div[1]"));
takeScreenshotOfElement(fbLogo);
//identify the locator of the WebElement – Login Button
WebElement loginButton = driver.findElement(By.id("loginbutton"));
takeScreenshotOfElement(loginButton);
}
@AfterClass
public void tearDown() {
driver.quit();
}
public static void takeScreenshotOfElement(WebElement element) throws IOException {
//capture the screenshot of full page
TakesScreenshot ts = (TakesScreenshot)driver;
File file = ts.getScreenshotAs(OutputType.FILE);
// read the screenshot image
BufferedImage fullScreen = ImageIO.read(file);
//get the width and height of the element
int width = element.getSize().getWidth();
int height = element.getSize().getHeight();
//get the X and Y coordinates of the webElement
Point location = element.getLocation();
//get the image using height,width and coordinates
BufferedImage logoImage = fullScreen.getSubimage(location.getX(), location.getY(),width, height);
ImageIO.write(logoImage, "png", file);
//save the captured screenshot
Random random = new Random();
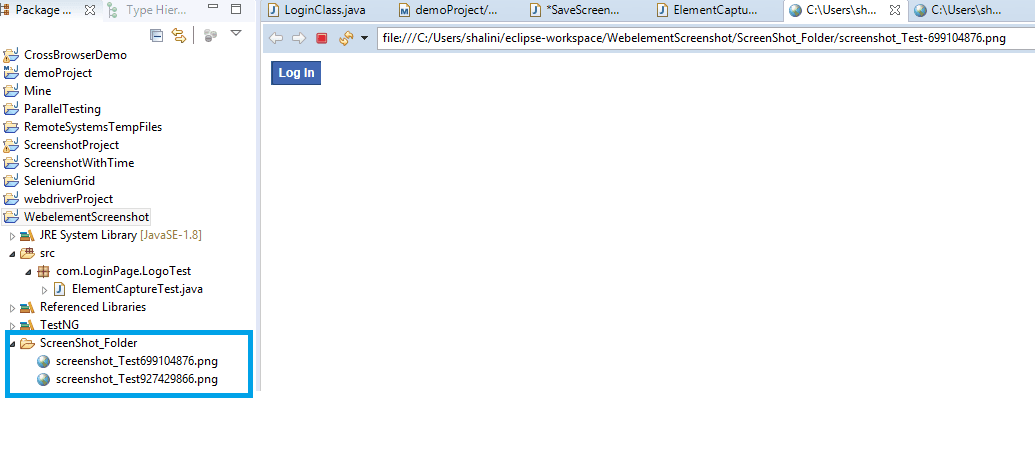
FileUtils.copyFile(file,new File("./ScreenShot_Folder/screenshot_Test"+random.nextInt()+".png"));
}
}
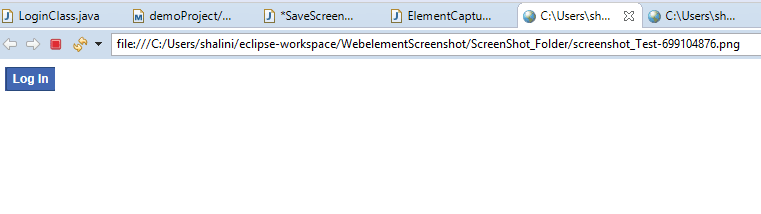
Facebook Logo

Login
Different Ways Of Saving The Captured Screenshots
To enhance readability, we can store the captured screenshot in Selenium by naming each of them dynamically. The two most preferred ways are-
- Saving the captured screenshots based on the timestamp.
- Saving the captured screenshots based on random Id.
Capture Screenshots And Store Them Based On Timestamp
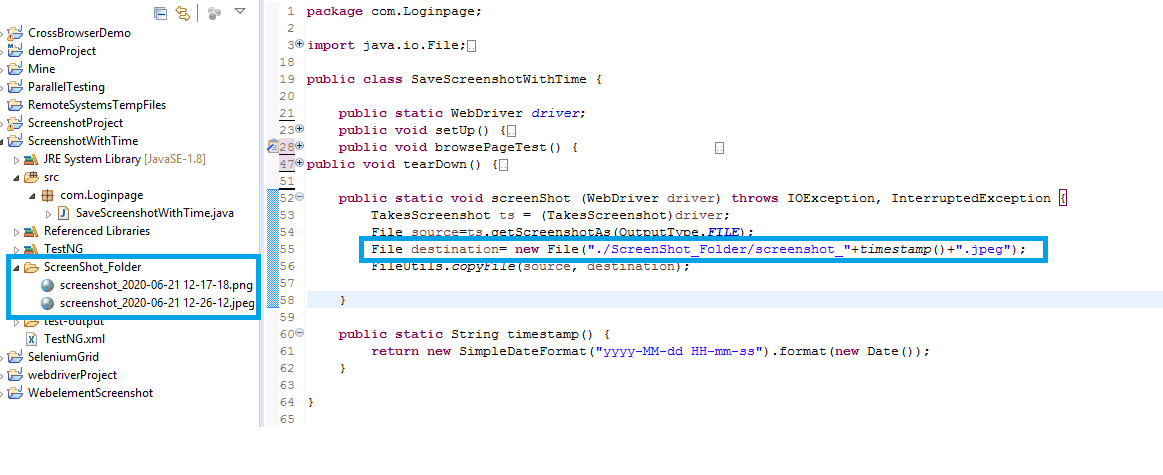
Usually, when you name the Selenium screenshot in the code, each and every time when the test is executed the screenshot would be replaced. So to overcome this, we may use the timestamp logic to save the screenshot as multiple files that are named based on the timestamp in every test execution.
I have added a separate method to capture the screenshots and name them based on the current time of text execution. Different time formats could be used.
package com.Loginpage;

import java.io.File;
import java.io.IOException;
import java.text.SimpleDateFormat;
import java.util.Date;
import java.util.concurrent.TimeUnit;

import org.apache.commons.io.FileUtils;
import org.openqa.selenium.OutputType;
import org.openqa.selenium.TakesScreenshot;
import org.openqa.selenium.WebDriver;
import org.openqa.selenium.chrome.ChromeDriver;
import org.testng.Assert;
import org.testng.annotations.AfterClass;
import org.testng.annotations.BeforeClass;
import org.testng.annotations.Test;

public class SaveScreenshotWithTime {

    public static WebDriver driver;


    @BeforeClass
    public void setUp() {
        System.setProperty("webdriver.chrome.driver", "C:\\Users\\shalini\\Downloads\\chromedriver\\chromedriver.exe");
        driver = new ChromeDriver();
    }


    @Test
    public void browsePageTest() {

    driver.get("https://www.facebook.com/");

    driver.manage().window().maximize();
    driver.manage().timeouts().implicitlyWait(10, TimeUnit.SECONDS);

    String pageTitle = driver.getTitle();
    System.out.println("The title of this page is ===> " +pageTitle);
    Assert.assertEquals(pageTitle, "Facebook – log in or sign up");
    try {
        screenShot(driver);
    } catch (IOException e) {
        // TODO Auto-generated catch block
        e.printStackTrace();
    } catch (InterruptedException e) {
        // TODO Auto-generated catch block
        e.printStackTrace();
    }

    }

    @AfterClass
    public void tearDown() {
        driver.quit();

    }


    public static void screenShot (WebDriver driver) throws IOException, InterruptedException {
        TakesScreenshot ts = (TakesScreenshot)driver;
        File source=ts.getScreenshotAs(OutputType.FILE);
        File destination= new File("./ScreenShot_Folder/screenshot_"+timestamp()+".jpeg");
        FileUtils.copyFile(source, destination);

    }

    public static String timestamp() {
        return new SimpleDateFormat("yyyy-MM-dd HH-mm-ss").format(new Date());
    }

}
Once the tests are executed, the captured screenshots are saved in the desired path based on the timestamp.
Capture Screenshots And Store Based On Random ID
We can use the random class in Java to generate random numbers and store the captured screenshots with this number.
We have to replace the timestamp logic used in previous code with the below
Random random = new Random();
FileUtils.copyFile(file,new File("./ScreenShot_Folder/screenshot_Test"+random.nextInt()+".png"));
Screenshots captured and saved by the random number generation logic.
Great! You have successfully captured Selenium Screenshots in different ways and learned how to save these screenshots. But what if I told you that there was an easy way to capture Selenium screenshots?

Easiest Way To Capture Selenium Screenshot
The easiest way to capture screenshots in Selenium is by using LambdaTest cloud Selenium Grid of 2000+ real browsers for desktop and mobile.
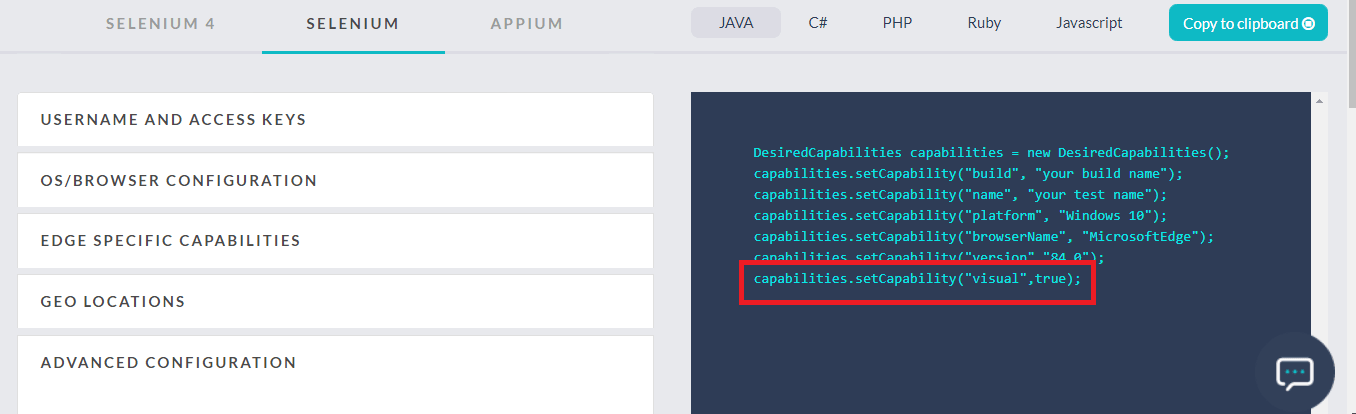
At LambdaTest, we want to make the Selenium testing experience as convenient as possible. Which is why we provide a toggle button in our Selenium Desired Capabilities Generator.
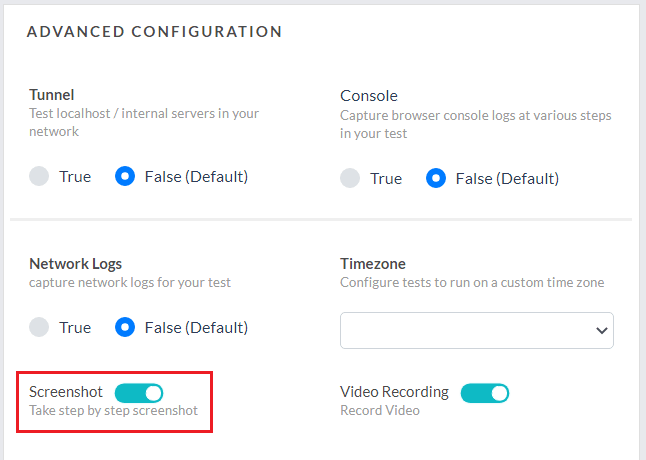
This button when turned on will add a capability called ‘ visual ’ in the desired capabilities class and set its value as true.
If you pass this capability in your Desired Capabilities class while running your Selenium testing script on LambdaTest Selenium Grid then we will generate step by step screenshots for you Selenium automation script.
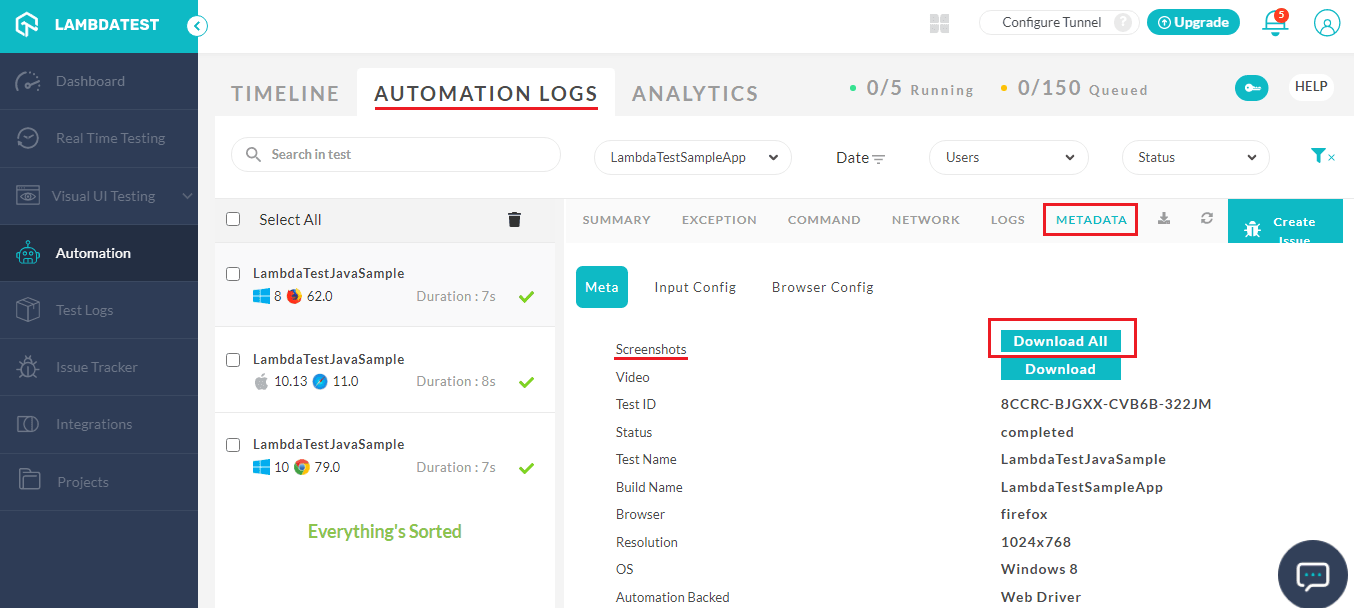
You can find these step by step screenshots on the Automation dashboard, by going to Automation Logs –> Metadata.
In the Metadata tab, you will find the button to Download All screenshots.
Porting your Selenium testing scripts to LambdaTest is easy. All you need to do is specify your LambdaTest username and access key as the environment variables to route your Selenium tests on a Remote WebDriver. Refer to our documentation on TestNG with Selenium.
We also offer RESTful API for capturing Selenium Screenshots for automated browser testing.
Note-The InvalidArgumentException error is somewhat similar to a TypeError in JavaScript, as both errors can occur for various APIs when the input value is not of the expected type, or is distorted in some way. Look at the type and bounds constraints for every WebDriver command.
Capture Automated Screenshots Without Selenium Scripts
We also offer a feature called Screenshot testing which allows you to capture full page screenshots of your website across 25 different browsers and operating systems. The tests can be executed either in Desktop or Mobile browsers.
You can create full page screenshots without writing any Selenium script in simply two steps.
Step 1: Once logged in, click Visual UI Testing 🡪 Screenshot.
Step 2: Enter the URL of the website you want to test, select the browsers and hit the capture button.
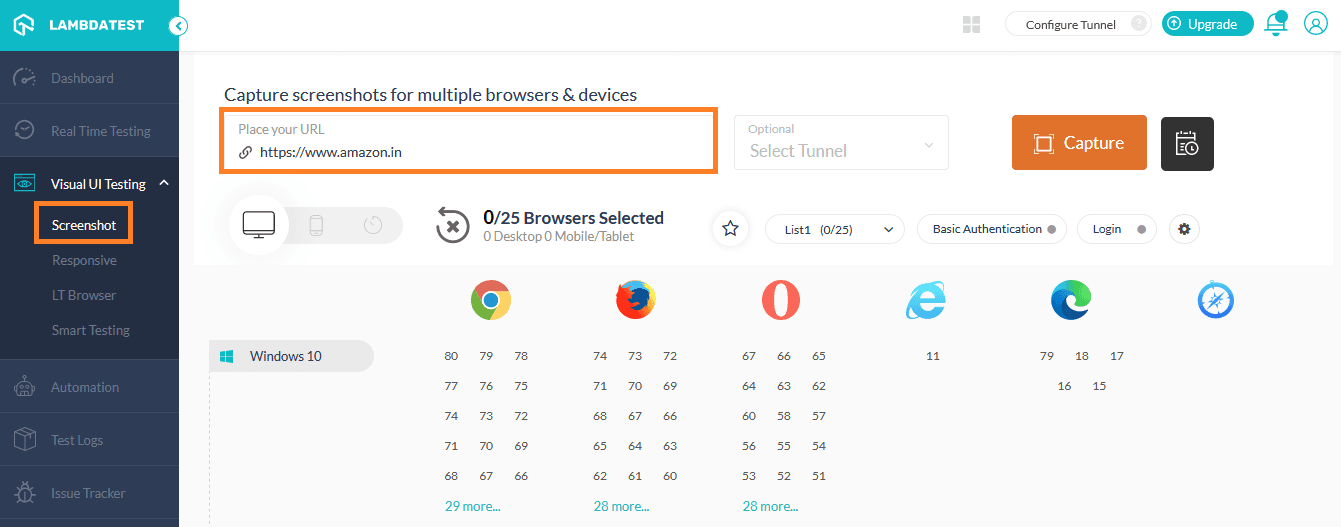
This will automatically generate screenshots of your web-application on your selected browsers and operating systems.
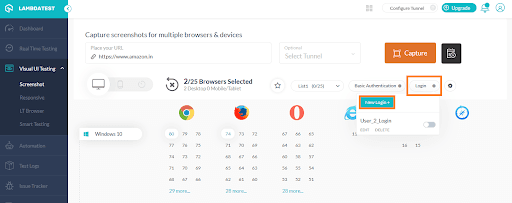
Capture Screenshots Behind Login
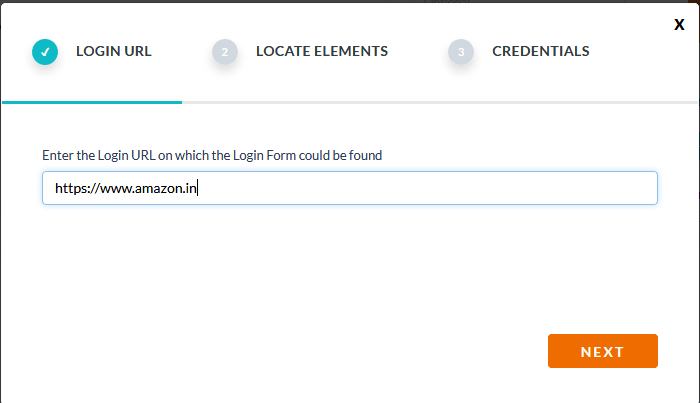
Step 1: To capture a screenshot behind login functionality, click the Login button and create a New Login profile.
Step 2: Enter the URL of the webpage and click Next.
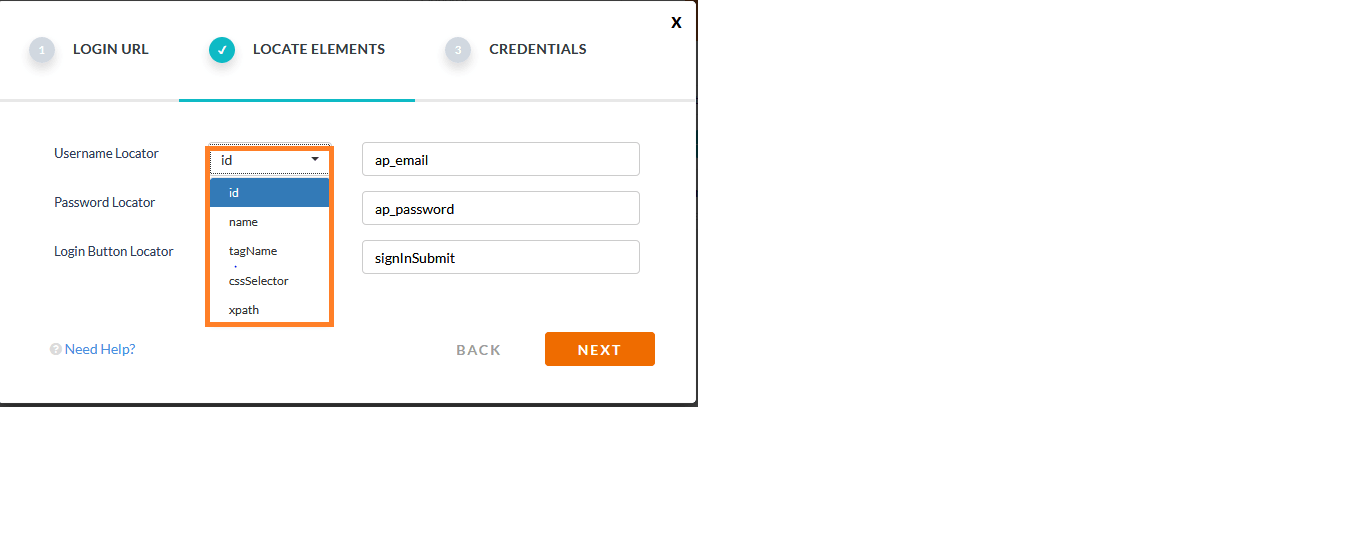
Step 3: Enter the locators of the username, password, and login button fields. Click Next.
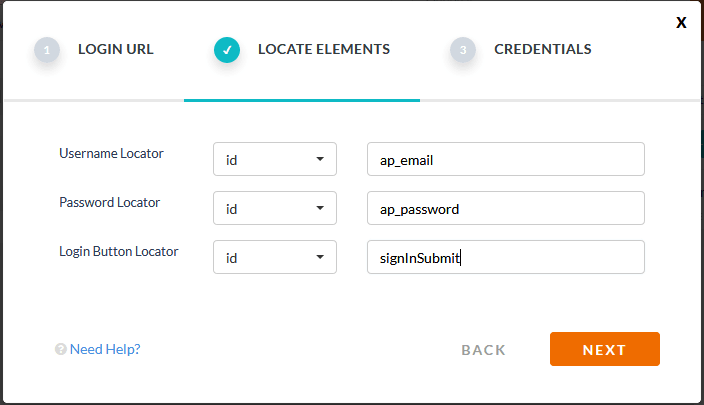
You can select any of the locators as shown below-
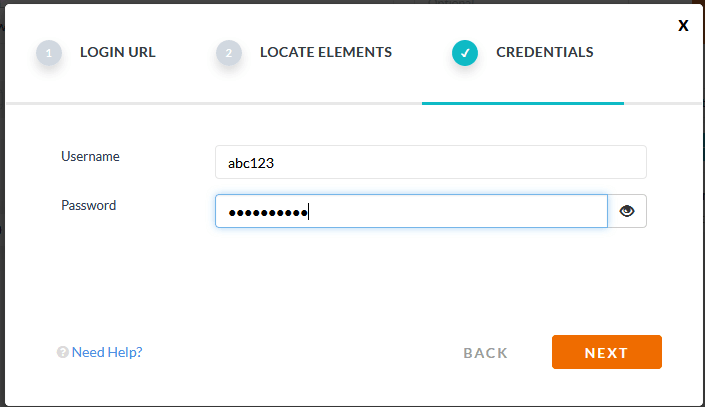
Step 4: Enter a valid username and password and click Next.
Step 5: Save the Login Profile.
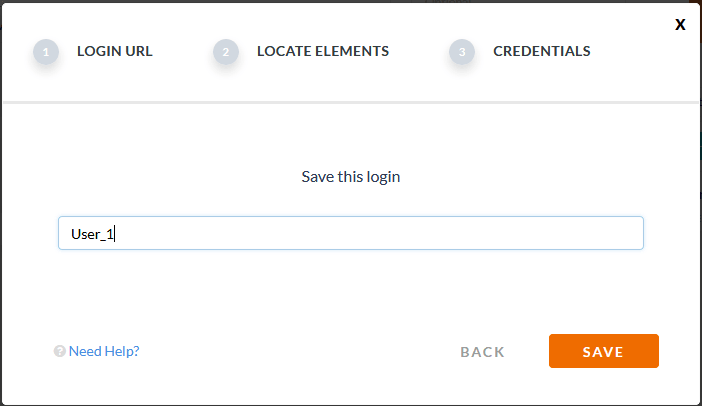
Step 6: Once saved, a profile would be created.
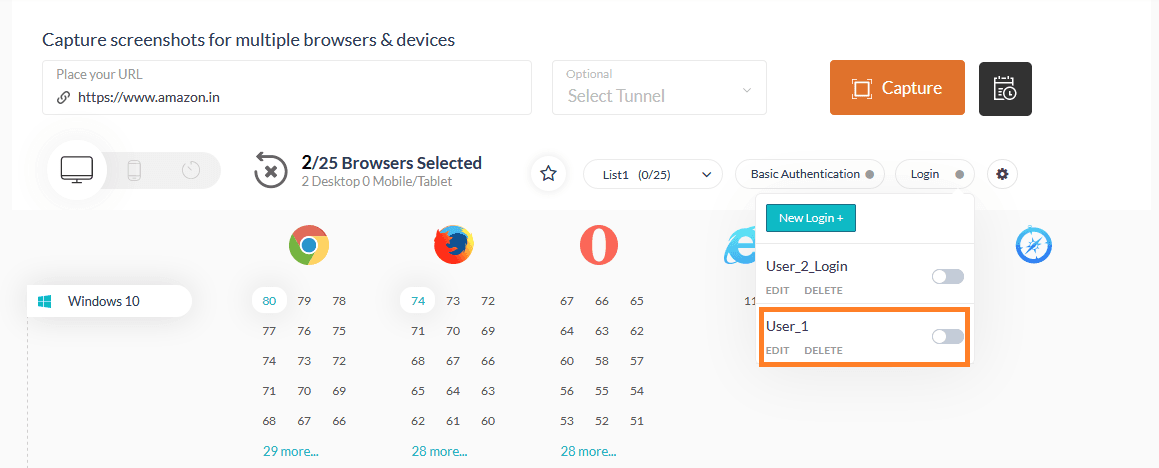
For capturing a screenshot for the same webpage with the same credentials you can just toggle the user profile.
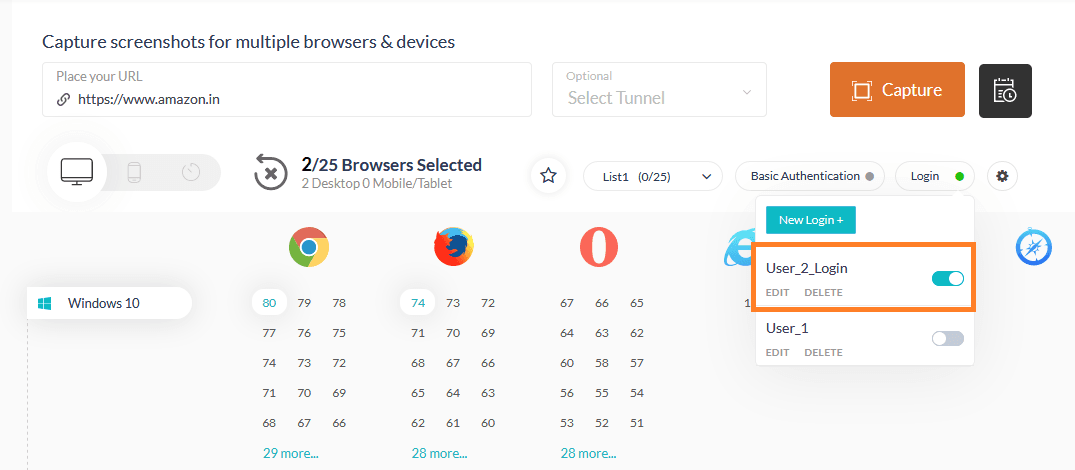
Step 7 : Select the browsers and the platform to execute the test and click Capture.
Once the test is executed in different browsers and platforms, the Selenium screenshots would be captured and displayed.
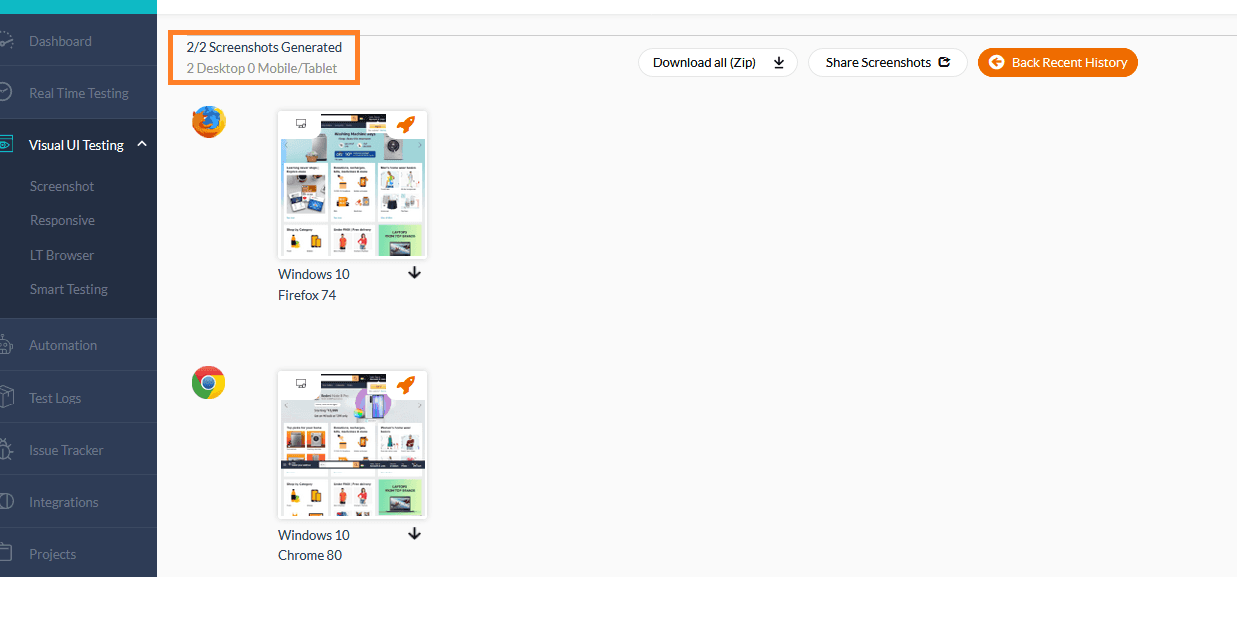
The screenshots can also be downloaded and verified.
Leverage Automated Screenshot API For Effortless Cross Browser Testing
Execution of test cases in multiple browsers, environments, and devices needs a lot of work. Finding the compatible browser version and valid version of devices requires strenuous effort. Even though capturing the screenshots might seem to be a piece of cake, organizing the captured screenshots to track for future reference remains to be complicated.
LambdaTest provides an easy approach to capture screenshots through Automated Screenshot API and storing them by the device/platform followed by the browser version. This way it provides better readability and tracking. The platform in which the screenshot has to be captured while test execution has to be provided as a json object in the request body and multiple browser versions can be written in an array which appears to be a straightforward approach in feeding the input.
Let me show you an example in capturing screenshots across multiple environments through LambdaTest Automated screenshot API.
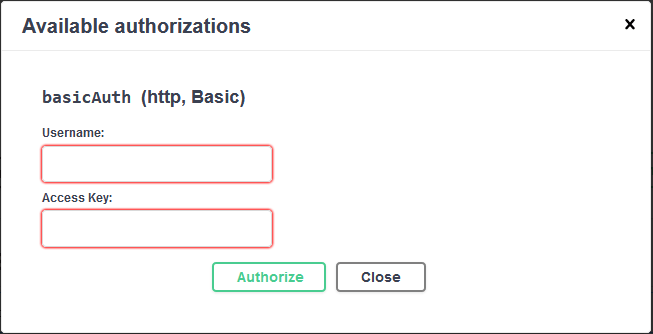
Step 1: Navigate to https://www.lambdatest.com/support/docs/api-doc/#screenshots and select Automated Screenshots API tab. Click the Authorize button.
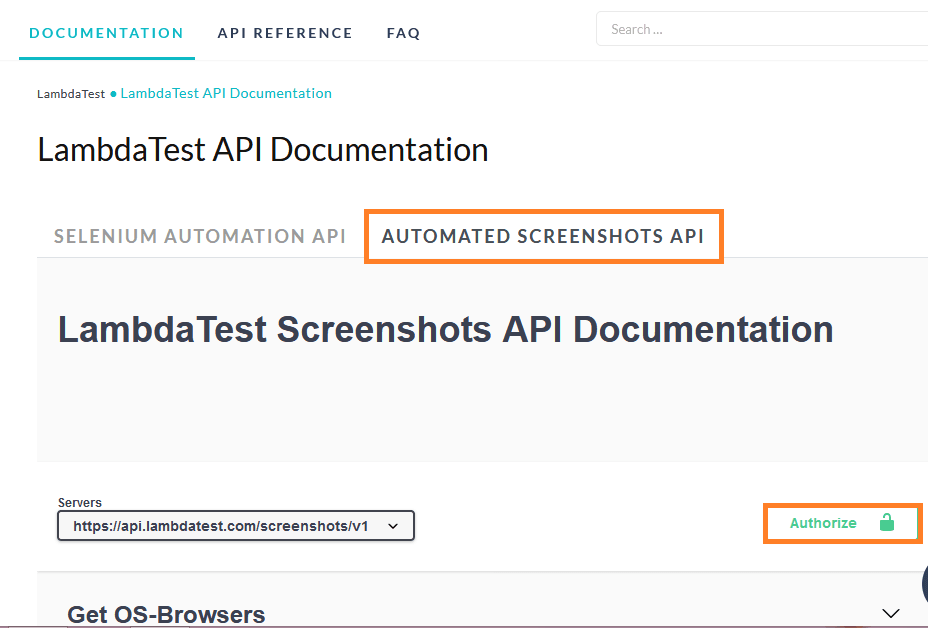
Step 2: Enter your username and access key which has been provided once you have signed into LambdaTest. Click Authorize.
Step 3: Click Start Screenshot Test and click Try it out.
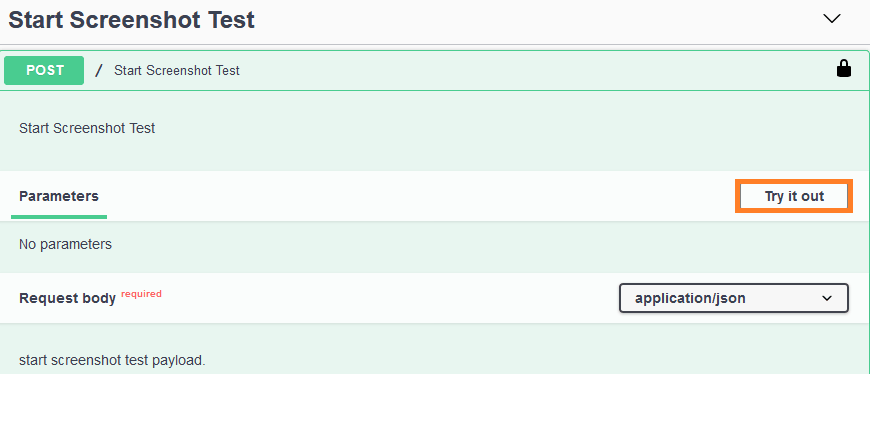
Step 4: To request this API to capture a screenshot, we have to construct a request body.
The HTTP method to capture the screenshot in this API is POST.
The request body of the screenshot API is of ContextType JSON and there are different tags that relay information about a webpage’s URL, the webpage to be automated, multiple browsers, platforms and devices on which the test has to be executed, resolution and layout of the screenshot and the preference of sending the captured screenshots via mail.
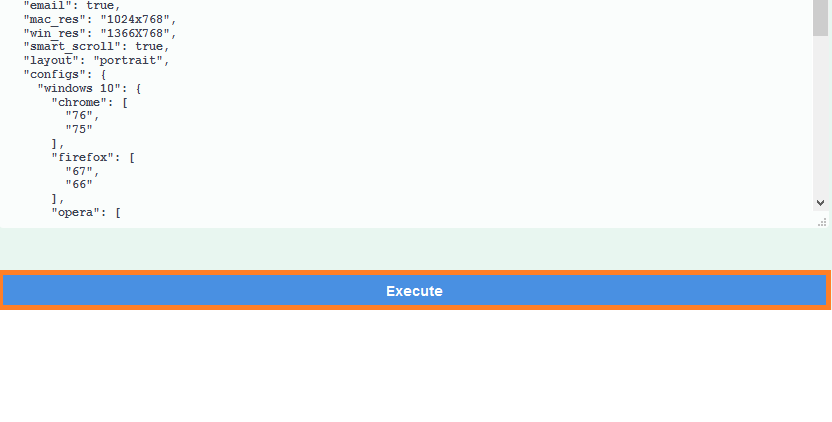
A sample request body is given below.
{
  "url": "https://www.facebook.com",
  "defer_time": 5,
  "email": true,
  "mac_res": "1024x768",
  "win_res": "1366X768",
  "smart_scroll": true,
  "layout": "portrait",
  "configs": {
    "windows 10": {
      "chrome": [
        "76",
        "75"
      ],
      "firefox": [
        "67",
        "66"
      ],
      "opera": [
        "58",
        "57"
      ],
      "ie": [
        "11"
      ]
    },
    "macos mojave": {
      "chrome": [
        "76",
        "75"
      ],
      "firefox": [
        "67",
        "66"
      ],
      "opera": [
        "58",
        "57"
      ],
      "safari": [
        "12"
      ]
    },
    "ios 12.0": {
      "devices": [
        "iphone xr",
        "iphone xs",
        "iphone xs max"
      ]
    },
    "android 9.0": {
      "devices": [
        "galaxy s9 plus"
      ]
    }
  }
}
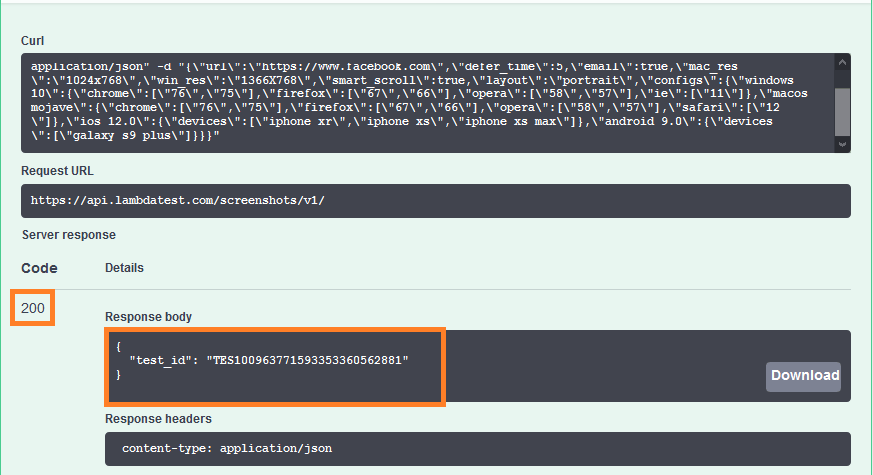
Step 5: Once after the request body is constructed, click Execute.
Step 6: On successful execution, we could see the HTTP status code as 200 and test_id has been generated as a response.
Step 7: Navigate to the main page of the LambdaTest App and click the Test Logs tab. We can see the logs of all the tests that have been executed on this platform. To trace the screenshot test here, use the test_id that was generated as a successful response.
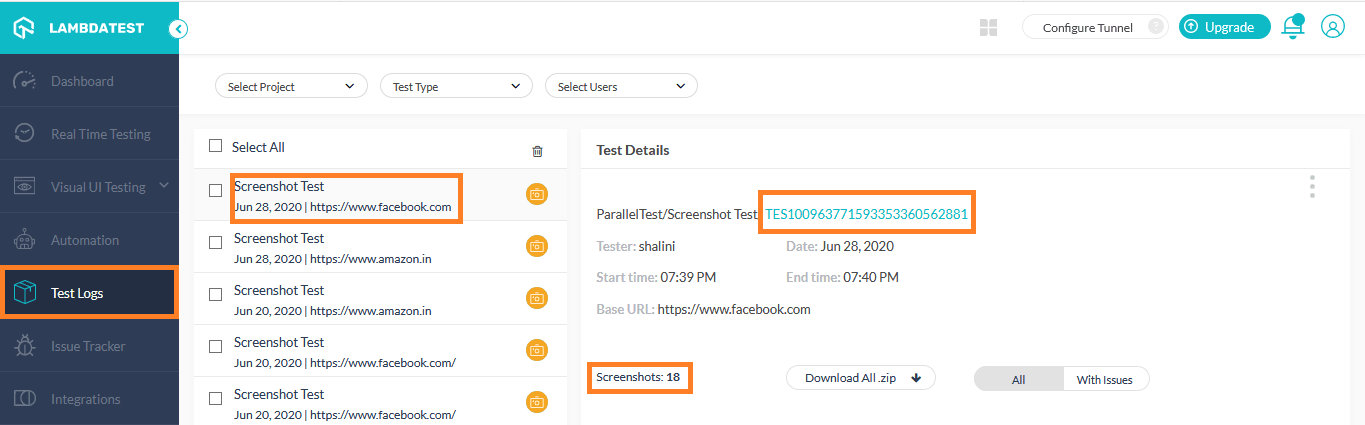
On scrolling down, the screenshots captured in different browsers, platforms and devices as mentioned in the request body can be seen.
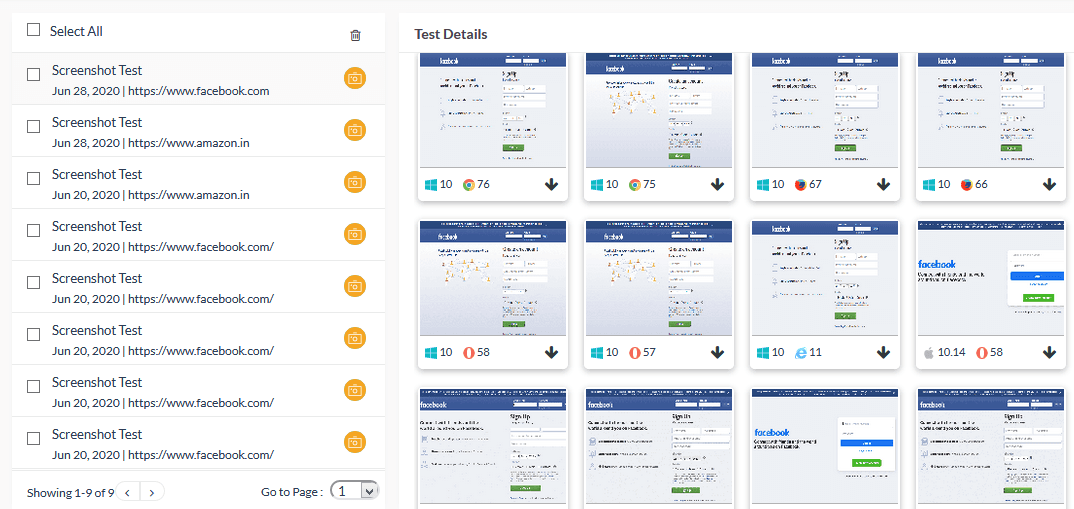
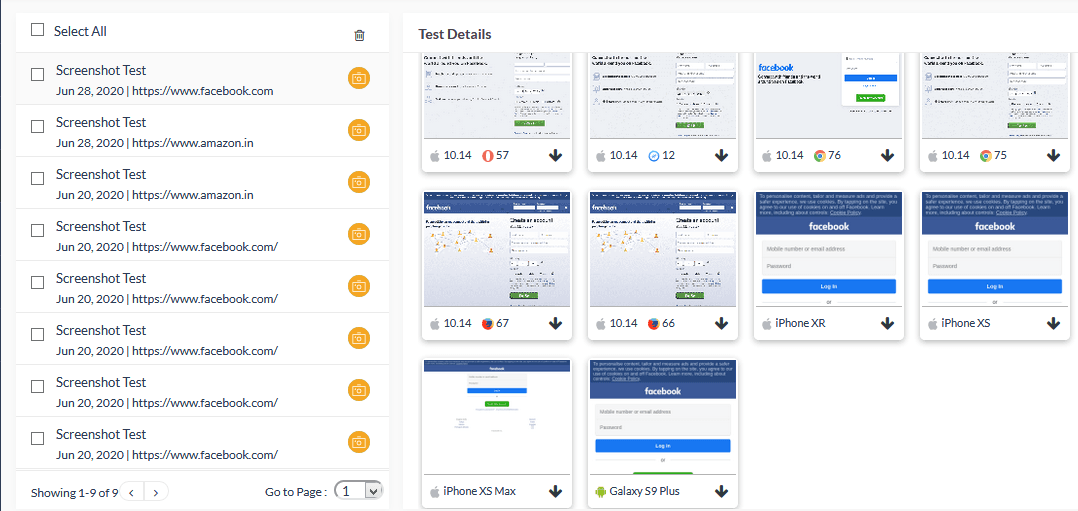
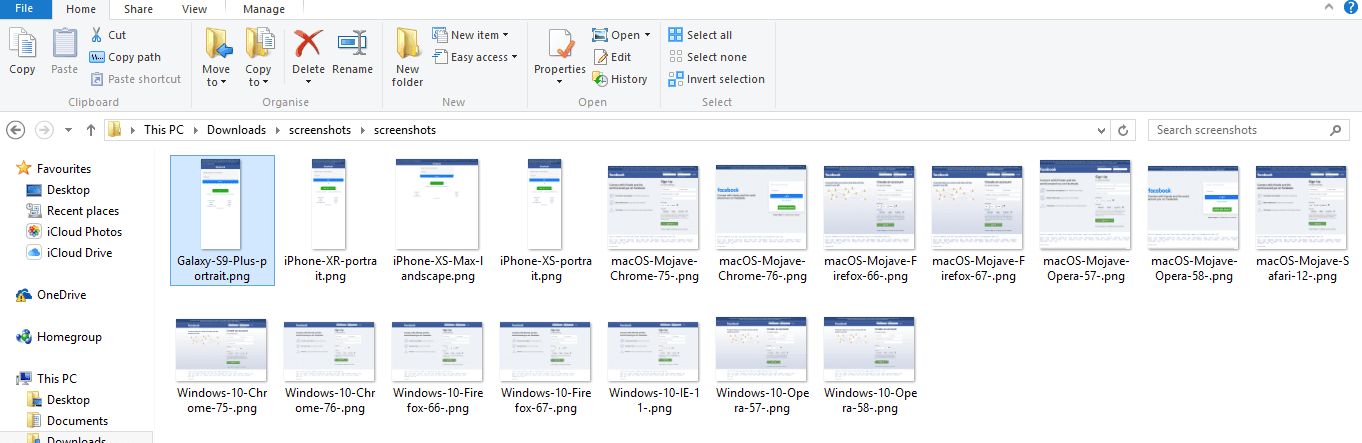
All the screenshots can also be downloaded in a ZIP file and then analyzed in detail. The screenshots would be named by the browser and its version, the platform, and the device in which the test was executed. This will ease the tracking of different test cases.
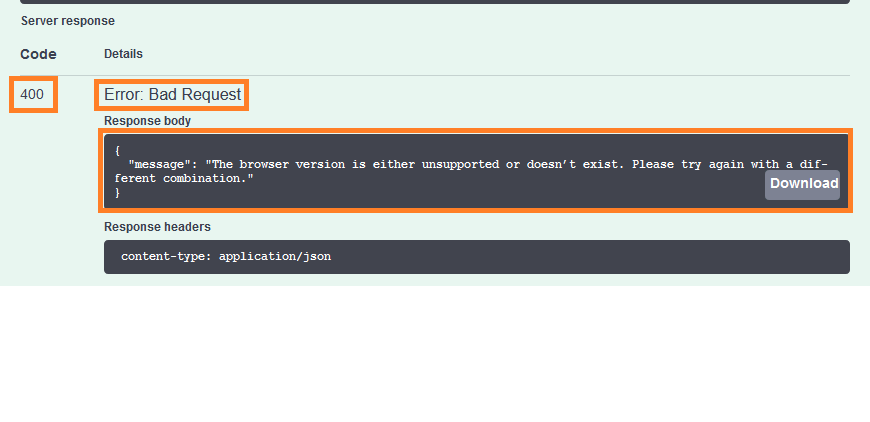
In case of any incorrect information in the request body like an incorrect browser version or invalid name, an error response would be thrown with 400 status code and relevant error message.
For example, if an invalid version of Google Chrome is given in request payload, an error response would be thrown.
Request body
{
  "url": "https://www.facebook.com",
  "defer_time": 5,
  "email": true,
  "mac_res": "1024x768",
  "win_res": "1366X768",
  "smart_scroll": true,
  "layout": "portrait",
  "configs": {
    "windows 10": {
      "chrome": [
        "101"
      ]
    }
  }
}
Response
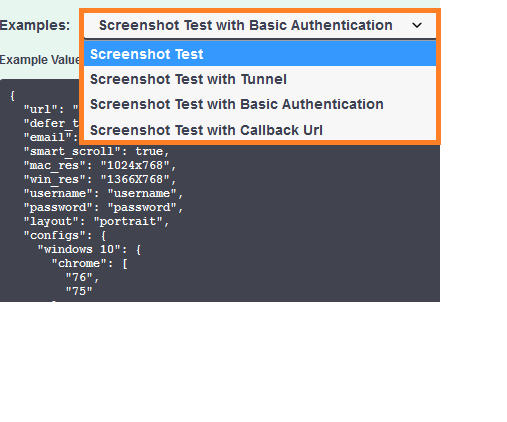
Apart from the basic webpage screenshot, you can also try taking a screenshot for login functionality using the ‘Screenshot Test with Basic Authentication’ option where you need to provide the username and password in the request body along with the other details seen before.
Final Thoughts
To summarize, I have walked you through the different ways to capture a screenshot in Selenium using the TakesScreenshot interface, ITestListener, ImageIO, Visual UI Testing and Automated Screenshot API in LambdaTest and various logics to save the captured screenshots. We have seen the importance of capturing Selenium screenshots in a web application.
Understanding the end to end flow of a work product is important for any tester as he has to know the entire functionality before starting the Selenium test automation process. Capturing a Selenium screenshot in each step of the test execution provides clarity of the workflow and it also eases the tracking of each test case.
I hope you have gained knowledge in capturing a screenshot in selenium. Step up, try it hands-on and let me know your views on the comment section below. Feel free to share this with your colleagues and friends and as it might help in overcoming the challenges in their Selenium test automation script. Explore the automation features until then Happy Testing…!!!