


Have you ever been asked for credentials while accessing a website on a browser? Let us understand why we are asked to fill up the credentials while accessing a few websites. This article mainly focuses on the introduction to authentication pop-ups on the website and the different ways to handle them using Selenium. Before we dive in deep and see how to handle login pop-up in Selenium WebDriver, let us first take a look at how the authentication pop-up looks on a website.
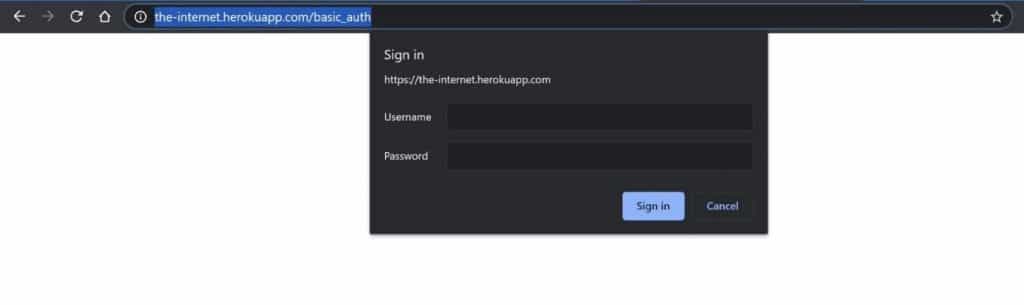
Let us navigate to a sample website. While accessing the website, the user would be prompted with a login pop-up. The user has to enter the username and password to further navigate into the site. Below is the screenshot of the authentication pop-up prompted on the website.
Why does this happen?
Some of the websites that have access to the servers require credentials to navigate further. Hence, while accessing these websites, the user would be prompted with an authentication pop-up to enter his credentials.
In this Selenium WebDriver Java tutorial, we will see different ways to handle login pop-up in Selenium WebDriver using Java.
Note-Random bytes generator helps you to generate a random bye output in your choice of output format, e.g., Binary, decimal, hexadecimal, etc. It is better to use a generator than a human guess or a classic algorithm, as there will be patterns in it after a certain number of iterations, but it is not the case with our tool. This Random Byte Generator by LambdaTest is free, easy to use, and doesn't have any ads or popups. Try now!
How to handle login pop-up In Selenium WebDriver?
To handle login pop-ups in Selenium WebDriver using Java, we can use either of the below ways.
- Pass the credentials in the URL of the web page.
- Using AutoIT.
- Using Selenium 4 Beta version.
Let us now understand each method in detail.
Handling login pop-up in Selenium WebDriver by passing the username and password in the URL
The basic authentication pop-up is similar to the alert that pop-ups when the browser is navigated to a specific web page. To handle the basic authentication popup, we can pass the username and password along with the web page’s URL.
The syntax for handling this login pop up is:
https://username:[email protected]
When the login pop-up is prompted, we enter the username as “admin” and the password as “admin” and then login. Thus, the user would be successfully logged into the website.
Below is the code to handle the basic login pop-up on the web page by passing the username and the password in the URL of the web page.
package Pages;

import java.util.concurrent.TimeUnit;

import org.openqa.selenium.By;
import org.openqa.selenium.WebDriver;
import org.openqa.selenium.chrome.ChromeDriver;

public class PopUp {

    public static void main(String[] args) {

            System.setProperty("webdriver.chrome.driver", "C:\\Users\\Shalini\\Downloads\\chromedriver\\chromedriver.exe");
            //Instantiate the webdriver
            WebDriver driver = new ChromeDriver();

            //Set the username
            String username = "admin";

            //Set the password
            String password = "admin";


            String URL = "https://" +username +":" +password +"@"+ "the-internet.herokuapp.com/basic_auth";
            driver.get(URL);

            driver.manage().timeouts().pageLoadTimeout(10, TimeUnit.SECONDS);
            String title = driver.getTitle();

            System.out.println("The page title is "+title);

            String text = driver.findElement(By.tagName("p")).getText();

            System.out.println("The test present in page is ==> "+text);

            driver.close();
            driver.quit();

    }

}
Once the credentials are entered correctly, the user will be authenticated successfully, and a proper message will be displayed on the website.

Handling login pop-up in Selenium WebDriver using AutoIT
AutoIT is a scripting language, which is popularly used for automating GUI applications and can automate tasks involving keyboard and mouse interactions. It is popularly used for automating the tasks involving file upload, file download, handling authentication pop-ups, etc. Now, let us install AutoIT and use it to handle the login pop-up on the web page.
- Download AutoIT from the official website of AutoIT or using the AutoIT download link.
- Navigate to the installed folder and open the AutoIT editor.
- In the editor, enter the below code to send the username and password for handling the authentication pop-up in the website.
Send("admin")
Send("(TAB)")
Send("admin")
Send("(ENTER)")
- Save the file with the extension .au3.
- Now, to convert the script to an executable file, right-click on the saved file and click Compile Script. You will see an executable file has been created.
- In the IDE, set the driver file’s path, enter the URL of the web page, and enter the AutoIT executable file path as below.
package Pages;

import java.io.IOException;
import java.util.concurrent.TimeUnit;
import org.openqa.selenium.Alert;
import org.openqa.selenium.By;
import org.openqa.selenium.WebDriver;
import org.openqa.selenium.chrome.ChromeDriver;

public class PopUpAutoIT {

    public static void main(String[] args) throws IOException {

            System.setProperty("webdriver.chrome.driver", "C:\\Users\\Shalini\\Downloads\\chromedriver\\chromedriver.exe");
            WebDriver driver = new ChromeDriver();

            driver.manage().window().maximize();
            String URL ="http://the-internet.herokuapp.com/basic_auth";

            driver.manage().timeouts().pageLoadTimeout(10, TimeUnit.SECONDS);
            Runtime.getRuntime().exec("C:\\Users\\Shalini\\Desktop\\Login.exe");

            try {
                Thread.sleep(5000);
            } catch (InterruptedException e) {
                e.printStackTrace();
            }

            driver.close();

    }

}
So far, we have seen different ways of handling the authentication pop-ups in Selenium. To get into an advanced level, let us try the same using the new features of the latest Selenium 4 beta version.
Note- Free Strip HTML Online, Base64 decoding is a way of translating text form into binary data so that it can be transmitted more easily via e-mail and HTML form data.Strip Tags (strips out all HTML and PHP tags from a string) is a function that allows you to strip out all HTML and PHP tags from a string, and can be used with a list of tags as well.
Handling login pop-up in Selenium WebDriver using Selenium 4 beta version
The latest version of Selenium has introduced the ChromiumDriver class, which has two methods, namely getDevTools() and executeCdpCommand() to access the chrome DevTools.
The getDevTools() method returns the new DevTools object, which allows the user to send the built-in Selenium commands. In previous versions of Selenium, we have used the technique of passing the credentials in the URL of the web page to handle the basic login pop-up in the website. Now in the Selenium 4 beta version, we can easily set the basic authentication by sending extra HTTP headers.
Below is the code snippet of handling the login pop up.
import com.google.common.util.concurrent.Uninterruptibles;
import com.sun.xml.messaging.saaj.util.Base64;
import org.openqa.selenium.WebDriver;
import org.openqa.selenium.chrome.ChromeDriver;
import org.openqa.selenium.chromium.ChromiumDriver;
import org.openqa.selenium.devtools.DevTools;
import org.openqa.selenium.devtools.v86.network.Network;
import org.openqa.selenium.devtools.v86.network.model.Headers;
import org.testng.annotations.BeforeTest;
import org.testng.annotations.Test;

import java.util.HashMap;
import java.util.Map;
import java.util.Optional;
import java.util.concurrent.TimeUnit;

import org.openqa.selenium.WebDriver;
import org.openqa.selenium.*;
import org.openqa.selenium.chrome.ChromeDriver;
import org.openqa.selenium.remote.DesiredCapabilities;
import org.openqa.selenium.support.ui.ExpectedConditions;
import org.openqa.selenium.support.ui.WebDriverWait;
import org.testng.annotations.*;
import java.time.Duration;
import java.util.concurrent.TimeUnit;
import com.google.common.util.concurrent.Uninterruptibles;

import org.testng.annotations.BeforeTest;
import org.testng.annotations.Test;


public class Auth {

        public static void main(String[] args) {
                System.setProperty("webdriver.chrome.driver", "C:\\Users\\Shalini\\Downloads\\chromedriver\\chromedriver.exe");
                ChromeDriver driver = new ChromeDriver();

                DevTools dev = driver.getDevTools();
                dev.createSession();
                dev.send(Network.enable(Optional.<Integer>empty(), Optional.<Integer>empty(), Optional.<Integer>empty()));
                Map<String, Object> map = new HashMap<>();
                map.put("Authorization", "Basic " + new String(new Base64().encode("admin:admin".getBytes())));
                dev.send(Network.setExtraHTTPHeaders(new Headers(map)));
                driver.navigate().to("https://the-internet.herokuapp.com/basic_auth");
                Uninterruptibles.sleepUninterruptibly(10, TimeUnit.SECONDS);

                driver.close();
        }

}
Note- Free HTML Entities to Text Converter Online converts certain characters to their corresponding HTML entities. These characters have special significance in HTML and can be converted to their related HTML entities.
Running the login pop-up test on LambdaTest
LambdaTest provides an online cloud platform to perform Selenium automation testing with ease on cloud Selenium Grid. LambdaTest offers the largest web and mobile cross browser testing platform, giving you the ability to test on 2000+ different browser/OS combinations.
Once you are logged into the website, you will be provided with a username and an access key that can be used to run your scripts in the cloud. You can get the username and access key from the Profile Section.
Below is the code snippet for executing the login pop-up test in LambdaTest.
package Pages;

import java.net.MalformedURLException;
import java.net.URL;
import java.util.concurrent.TimeUnit;
import org.openqa.selenium.By;
import org.openqa.selenium.remote.DesiredCapabilities;
import org.openqa.selenium.remote.RemoteWebDriver;
import org.testng.annotations.AfterTest;
import org.testng.annotations.BeforeTest;
import org.testng.annotations.Parameters;
import org.testng.annotations.Test;
public class Demo {

    String username = "USERNAME"; //Enter your username
    String accesskey = "ACCESSKEY"; //Enter your accesskey

    static RemoteWebDriver driver = null;
    String gridURL = "@hub.lambdatest.com/wd/hub";

    boolean status = false;

    @BeforeTest
    @Parameters("browser")
    public void setUp(String browser)throws MalformedURLException
    {
        if(browser.equalsIgnoreCase("chrome"))
        {
        DesiredCapabilities capabilities = new DesiredCapabilities();
        capabilities.setCapability("browserName", "chrome");     //To specify the browser
        capabilities.setCapability("version", "70.0");        //To specify the browser version
        capabilities.setCapability("platform", "win10");         // To specify the OS
        capabilities.setCapability("build", "AuthPopUp");               //To identify the test
        capabilities.setCapability("name", "AuthPopUpTest");
        capabilities.setCapability("network", true);         // To enable network logs
        capabilities.setCapability("visual", true);             // To enable step by step screenshot
        capabilities.setCapability("video", true);            // To enable video recording
        capabilities.setCapability("console", true);             // To capture console logs
        try {
            driver = new RemoteWebDriver(new URL("https://" + username + ":" + accesskey + gridURL), capabilities);
        } catch (MalformedURLException e) {
            System.out.println("Invalid grid URL");
        } catch (Exception e) {
            System.out.println(e.getMessage());
        }
        }

        else if(browser.equalsIgnoreCase("Firefox"))
        {
        DesiredCapabilities capabilities = new DesiredCapabilities();
        capabilities.setCapability("browserName", "Firefox");    //To specify the browser
        capabilities.setCapability("version", "76.0");        //To specify the browser version
        capabilities.setCapability("platform", "win10");         // To specify the OS
        capabilities.setCapability("build", " AuthPopUp");    //To identify the test
        capabilities.setCapability("name", " AuthPopUpTest");
        capabilities.setCapability("network", true);         // To enable network logs
        capabilities.setCapability("visual", true);             // To enable step by step screenshot
        capabilities.setCapability("video", true);                           // To enable video recording
        capabilities.setCapability("console", true);             // To capture console logs
        try {
            driver = new RemoteWebDriver(new URL("https://" + username + ":" + accesskey + gridURL), capabilities);
        } catch (MalformedURLException e) {
            System.out.println("Invalid grid URL");
        } catch (Exception e) {
            System.out.println(e.getMessage());
        }
}
}


        @Test
        public void Login() {
            String username = "admin";

            String password = "admin";


            String URL = "https://" +username +":" +password +"@"+ "the-internet.herokuapp.com/basic_auth";
            driver.get(URL);

            driver.manage().timeouts().pageLoadTimeout(10, TimeUnit.SECONDS);
            String title = driver.getTitle();

            System.out.println("The page title is "+title);

            String text = driver.findElement(By.tagName("p")).getText();

            System.out.println("The test present in page is ==> "+text);


    }

     @AfterTest
     public void tearDown() {
         driver.quit();
}


}
TestNG.xml
<?xml version="1.0" encoding="UTF-8"?>
<!DOCTYPE suite SYSTEM "http://testng.org/testng-1.0.dtd">
<suite name="TestSuite" parallel="tests">
<test name="ChromeBrowserTest">
<parameter name="browser" value="chrome"/>
<classes>
<class name="Pages.Demo">
</class>
</classes>
</test>
</suite>
To run this test in the LambdaTest platform, please follow the below-mentioned steps:
- Right-click on the TestNG.xml that you have created in the IDE.
- Click Run As–> TestNG Suite. Now the test will be executed on the LambdaTest platform.
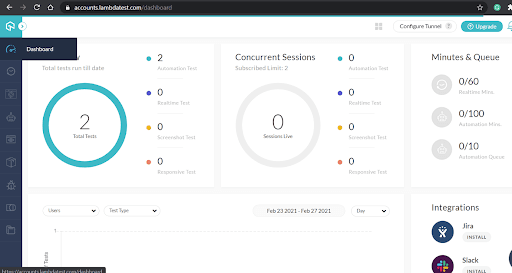
- Once your tests are executed, navigate to your LambdaTest account in the browser and click Dashboard in the left-hand side panel.
This page shows an overview of the tests that are run on the platform.
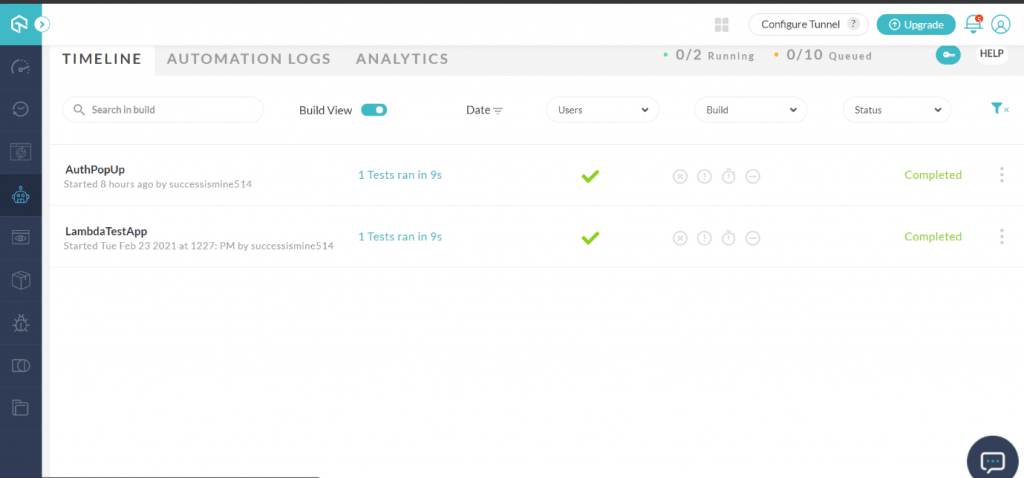
- Next, click the Automation label in the left-hand side panel.
This is the place where you have to identify your executed tests. It contains multiple tests, and to identify the specific test, you have to search using the build name that you have provided in the script.
In the code above, we have named the build as “AuthPopUp” and now search for that build. This page also shows the status of your build and the time taken for execution.
- Click the Build View to view the tests that were run.
You can see the test “AuthPopUpTest,” which was provided in the script, and this is how we identify our tests in LambdaTest. Here you can verify all the test details that have been provided in the script, like the browser, browser version, operating system, and version in which the test was executed. This would be the same as provided in the test script.
As we have enabled video recording in the code, you will see a video attached to the test on this page, which has recorded all the test steps while executing the test.

By playing the video, you can view how the tests were executed. In case of failure, this would help to analyze the point where the failure has occurred.
Wrap Up
To summarize, we have seen different ways of handling the login pop-up on the web page using Selenium WebDriver in Java. I hope you all have gained good knowledge through this article. Please share this article with your friends and peers, and I would love to hear your comments on this. Happy Testing…! 😊